

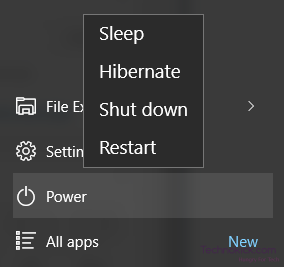
There are three ways to shut-down your PC in Windows, Shut Dow completely which will suspend all running applications, Sleep, which will save the state of the PC with all running apps in memory and ready to deploy when you wake the PC up, and Hibernate, which is similar to Sleep, but will not save the state in memory instead will save as files in Hard Drive and will not hog on Battery power to keep the machine active. Windows has almost always made the hibernate option disabled by default, and it’s the same story with Windows 10.
Hibernation is a power-saving state made mainly for Laptops, and Notebooks, which saves all your open documents and files into the Hard-Drive and shut down the PC completely. When you start your PC again, it will automatically open all the documents and apps right where you left them.
Also Read – Turn off updates in windows 10
How to Enable or Disable Hibernate in Windows 10:
- Press Windows + X keys to open Power menu and select Command Prompt (Admin)
- To enable the Hibernate, type command “powercfg/h on”
- To disable the Hibernate, type command “powercfg/h off”
Manage settings for Hibernate:
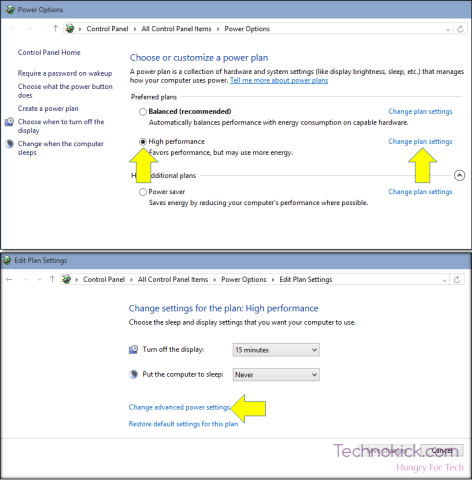
- Press Windows + X key to access Power Menu and select Power Options from there.
- Click “Change plan settings” next to the power plan you have active.
- Now select “Change advanced power settings”.

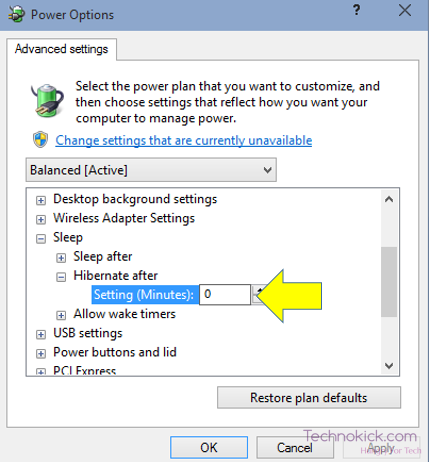
- In Power Options scroll down to expand Sleep
- Click on Hibernate After
- Enter the time you want your PC to be idle before it Hibernates.
- Press OK to apply the changes.
There you go, now you should have an option to Hibernate your PC in the Power menu!
Have Something to add in the story? Comment below!
Update for those commands to be used in Windows Powershell (Admin)
To enable Hibernate function
powercfg.exe /hibernate on
To disable Hibernate function
powercfg.exe /hibernate off
More info: https://docs.microsoft.com/en-us/troubleshoot/windows-client/deployment/disable-and-re-enable-hibernation?source=docs