There is no way to turn off Windows Updates in the control panel or the new settings app in Windows 10, like previous versions of Windows. However, there is a way around this problem and turn off Auto Updates in Windows 10. Let’s find out how.
But, first, WHY would you, or anyone want to turn off updates?
In Windows 7, 8, or 8.1 there is an option in the Windows Update settings to:
- Install Updates automatically (Recommended)
- Download Updates but choose when to install them
- Check for updates but let me choose whether to download and install them
- Never check for updates (Not Recommended)
These options at least gave a choice if you want to download and install the updates. But, when it comes to windows 10, there is no such option, to avoid the auto updates in the Windows 10 Update and Security Settings.
Microsoft explained that the updates will differ from client to client and the updates installed will also be dependent on the type of system of client. And none of those releases have an option to turn off updates. So, here’s a workaround to stop them.
Turn off Windows Updates in Windows 10
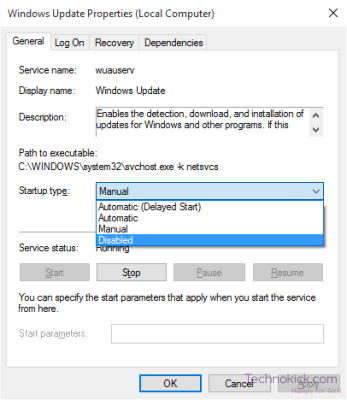
You can turn off updates using the Windows Update Service. Go to Control Panel > Administrative Tools, you can access services. When in the services window, scroll down to the Windows Update listing, and turn off the process. You can do so by right-click on the option > Properties > and select Disabled. This will disable Windows Updates until you manually turn it on by following the same steps, and select Enabled in the last step.
But since Windows is following a service model, you have to manually update your PC every time, in order to get the latest set of features or a newer build. This the reason why you might need to enable the update service again to get the latest set of features or when upgrading to a later version.
If after you enable the update service, if you are facing an error saying “Updates not Installed because PC was stopped” or something similar, just click on “Check for Updates” in the update menu after turning on the update service and it should all be fine.
If you are using a version of Windows with “Group Policy”, you can change the settings using the GPE. Run ‘gpedit’ and navigate to – Computer Configuration > Administrative Templates > Windows Components > Windows Update.
On the right-side, double-click on Configure Automatic Updates and change its settings to meet your need.
We do not recommend that you disable automatic Windows Update in Windows 10. If your computer is fine with downloads in background and doesn’t affect your work, it is not advisable to do it. But if you face slowdown of computer due to updates downloading and installing in the background, the above tip to turn off Windows updates in Windows 10 will be of some help.
The easiest way to turn off updates is to set your network connection to ‘Metered’, and that will prevent Windows from downloading automatic updates. To set your connection as metered, you need to – Settings App > Network and Internet > WiFi > Advanced, here turn on the option for ‘Set as Metered Connection’.
Microsoft has also released a tool called Show or Hide Updates that allows users to hide or block specific updates which you don’t want to download or install.


